Here are some tips for arranging pictures on a wall: Avoid crookedness, stagger the frames, and hang art at eye level. Depending on the size and shape of the room, you may want to consider using different types of frames. If you can’t hang several large pictures on the same wall, use a few small ones.
Staggering frames to create interest
One way to add visual interest to your pictures is by staggering the frames. This is especially helpful if the pieces are of equal size. The recommended spacing for horizontal groupings is 5 inches (12.7 cm), but you can adjust this to your liking.
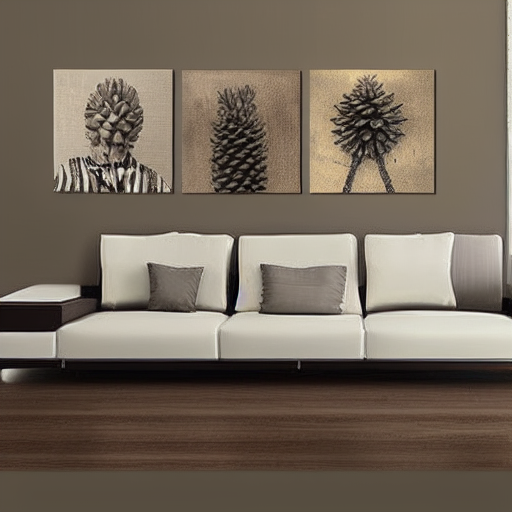
For best results, hang paintings in threes, not fours or fives. This creates visual balance and works particularly well with large collections of paintings or over a fireplace mantle. However, make sure the pieces are evenly spaced. If they’re too close together, they’ll look cramped and crowded. Staggering your frames to create visual interest is also a great way to give the illusion of depth to your pictures.
You can use a carpenter’s level to measure the gaps between your pictures. Make sure to mark the spots where you’d like the hardware to hang. Also, use a level to make sure that everything is even. This will prevent you from making mistakes or messing up your arrangement.
Before hanging your frames, decide whether you want them vertical or horizontal. After determining the layout, decide what kinds of pictures you want to use and how you want to arrange the frames. You should also take into account the space available on the wall.
Hanging art at eye level
When hanging art, it is important to remember that eye level is different for everyone, so you need to determine what level works best for you. The general rule is to hang artwork between 60 and 66 inches above the floor, but you can adjust this as needed. If you are short, you should hang your art slightly higher.
The goal of most wall art is to catch the eye of visitors and residents. When hanging art, it is generally recommended that it be placed between 57 and 65 inches from the floor, which will put most adults at eye level. It is helpful to measure the piece at the midpoint so that you can standardize the height. You may also need to adjust the height of a grouping of pieces if they are not hanging at eye level.
Another rule is to hang the bottom edge of the artwork at eight inches or less from the nearest piece of furniture. This rule will allow for an even spacing between the two pieces. Ideally, you should have two equal-sized pieces on the same wall. However, if you have a high ceiling, you should keep these pieces lower and a little further away from the top of the furniture.
It is also important to hang multiple pieces of art at eye level. While this rule is applicable to most places, you may need to adjust the height depending on the location of each piece. This is why it’s useful to create templates so that you can get a better idea of the overall layout of your wall. You can also examine the wall template visually before hanging your artwork.
Using a D ring to secure picture hanging
You can hang a picture on a wall by using a D ring. First, pull the picture hanging wire through the left D ring. It is best to leave about three or four inches of wire on each side. Next, twist the remaining wire around the right D ring. Be sure not to twist it back on itself or it will untwist over time.
To mount a picture on the wall, you need to mark a suitable space for the picture and mark the height of the wall and the viewing distance. Then, screw or nail hooks into the wall. Use appropriate wire for the weight of the picture frame. Choose a length that is at least one-and-a-half times longer than the width of the frame. The wire must be long enough to be wrapped around the picture and secure.
When hanging a picture on a wall, make sure to install the D ring screws in the correct position. The screws are usually made of zinc-plated steel. They are able to hold up to 170kg of weight. They also allow the picture to be moved four inches when needed.
Hanging a painting on a wall can be difficult if you’re not experienced in the process. The D-rings are often not in the exact location or aligned properly. You may have to reposition the rings every now and then to make them line up properly. In addition, the picture may lean away from the wall if the D-rings are not properly aligned.
Using paper replicas of your pictures to arrange pictures on a wall
When arranging pictures on a wall, the first thing you want to do is make a blueprint. You can trace the outline of each picture with a pencil and cut out squares. After that, you can tape the squares to the wall. Then, you can move them around until they look the way you want them to. Be sure to use a level to check your squares for evenness.


