When organizing your art room, the first step is to determine the amount of space available for each item. You can store large art supplies on shelves, but small art supplies can be tucked away in baskets. If you don’t have the space for shelves, open containers are ideal. You can also use pegboards with adjustable containers. In addition to shelves, you can also use rolling carts for supplies.
Organizing art supplies
Organizing your art supplies can be a difficult task, but there are ways to make the process easier. Using storage containers for your supplies, such as canvas bins or brush holders, can keep them organized and protect them from dust. Storage containers can also make your art supplies portable, so you can paint in different rooms or store them in closets.
One of the most important art supplies is paper. You can use a simple basket to organize it vertically. Another great option is a pegboard that features adjustable containers. You can also store your art supplies on rolling carts. Once you have them all organized, you’ll be able to find what you need with ease. It’s a great idea to label your containers so you’ll know what is in each one.
Another way to organize your art supplies is to reuse them. If you’re looking for cheap storage solutions, consider repurposing old items or investing in vertical storage containers. These options are easy to set up and don’t require expensive purchases. If you’re trying to reduce clutter, consider reusing or recycling art supplies when you’re reorganizing your classroom.
When it comes to organizing art supplies, it’s important to find creative ways to make the most of your space. Old coffee cans can be used as storage containers for small items, such as buttons, while shoeboxes work well for larger items.
Using wine glasses
If you have a space in your home that could use some art room organization ideas, you may want to try painting wine glasses. The stems and base can be painted with any design you choose. You can use either natural or synthetic paint. You can also use a sponge to apply paint. When painting a wine glass, you should choose a sponge that is flexible and can mold to the shape of the glass.
If you plan to paint wine glasses, you should first prepare them by rinsing them with hot water and then drying them thoroughly. After drying, you should use a glass cleaner or white vinegar or denatured rubbing alcohol to clean them. The alcohol will allow acrylic paint to adhere to the glass better. If you do not want to use a sponge, you may want to tie up the bottom portion of the wine glass to avoid getting paint on it.
You can also decorate wine glasses by using stamps. Using these, you can color them with markers or other mediums. You can also use theme-based designs for wine glass sets. Alternatively, you can get the kids involved in the decorating process. They can draw shapes on the wine glasses or recreate paintings on them. When they’re done, they can use these wine glasses for decoration. To make them even more interesting, you can put candles inside them.
Using rolling carts
Using rolling carts in the art room can help you keep track of a variety of art supplies. Instead of storing them on shelves, you can use compartments and a variety of hanging materials. These can be easily accessed from any side of the art cart, and are a great way to keep your supplies organized. You can also decorate them by using clothespins and ribbons.
One of the most important things to keep in mind when organizing your art supplies is to store them in sub-categories. This will make them easier to find next time you need them. Also, you should check the cart once a week to make sure that it is clean and tidy. Checking the supplies often will help you realize when they need to be replaced.
Another tip to keep art supplies organized is to place them in a tiered rolling cart. This will help to keep similar supplies together and also make it portable. You can use the cart to paint in different rooms or even store them in your closet. This is an easy and affordable way to create organization in your art room.
While organizing the art supplies in a cart, you also need to consider the age of the kids. Younger kids should have simple drawing supplies, while older children can have more elaborate supplies. Remember that it isn’t necessary to buy every single item in the cart. Choose those that your kid will enjoy using the most.
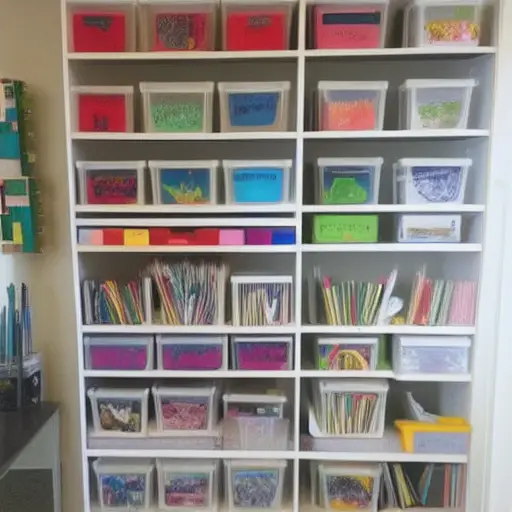
Using shelves
Using shelves for art room organization can save space in a tight space. It helps organize art supplies and helps students find them quickly. Shelves with drawers can hold art supplies or digital files. Label the drawers to make sure they are easily found. If you don’t want to use shelves, consider using bins for your art supplies.
You can use baskets to store different art supplies. These can be arranged in a specific category. Open baskets are good for aesthetically pleasing supplies, while closed bins are better for unfinished art supplies. Shelves can also be mounted on the walls and used for storage or for display. They’re perfect for displaying delicate crafts or sketchbooks.
Decorative shelves are another option. These shelves usually hang on the wall and can be used for storing acrylic paints. Many of these shelves are divided into several sub-compartments, so different types of acrylic paint can be sorted into a separate area. These shelves aren’t a good choice for large amounts of acrylic paint, but they’re good for smaller amounts of supplies. For larger amounts of acrylic paint, consider investing in an acrylic paint tray instead.
Shelves can also be used for paper files. White wall storage is great for keeping craft supplies organized. You can also use shelving along the ceiling to make the most of vertical storage space. Another good option for art supplies is a tiered rolling cart. This can help keep everything organized and mobile. You can use it to paint in different rooms or to store art supplies in closets. This is also an inexpensive option.
Using easels
Using easels as art room organization can help you save space and promote student pride in their work. These versatile tables offer plenty of work space and come with features like a paper dispenser and a chalkboard or whiteboard. You can even find ones that are adjustable, so younger and older students can work side-by-side.
Art easels come in all different shapes, sizes, and designs. Many are portable and can be easily transported from room to room. This is a great option if you don’t have a designated art studio. However, it’s important to understand that these easels are not for every artist. Some are not designed to work in a horizontal position, which is not ideal for some artists.
Easels are also great for keeping all kinds of supplies organized. An art easel is an excellent way to store your paint and paintbrushes. An easel can also double as a tabletop storage area for art supplies. Some art supplies can be stored in a jar on the easel’s shelf, making it easy to find what you need.
If you’re a professional artist, you’ll want to consider getting a larger easel with built-in storage. A giant easel is great for large paintings or for professionals who work in a dedicated studio. However, you may want to consider buying a more portable easel for smaller paintings.
Using lampshades
Using lampshades as art room organization options is a great way to use a space that is often overlooked. You can turn a plain shade into a unique display piece by decorating it with ribbons and other decorations. You can even repurpose old sweaters and use them to decorate your lampshades. This idea was inspired by the blogalacart project.
When choosing lampshades, you need to consider the color scheme of the room. Bold colors make great focal points, while neutral shades will add subtle accent color to the room. For example, if you’re using all-white decor in your room, a light shade will best diffuse the light, while a dark one will help to create a mood.
Another great idea for lampshades is to decorate them with photos. You can use them on their own or paste them in a garland. You can even add washi tape or foil to create a design. You can use old clothes for this project, but try to use ones that aren’t too ripped or stained. You can also use pullovers to add a bit of texture to the lamp.
If you want to make your lampshades more decorative, consider making your own. Not only will this save you money, but it will also let you control the appearance of the room. The fabric you choose should coordinate with the rest of the room. Moreover, you can customize the lampshade with fabric or other craft supplies.


